DIY Guide to Panelling
This is a step by step guide to panelling which I added to my living-room. Panelling can seem like a daunting DIY job but honestly, if I can do it anyone can! I’ve tried to break the steps down to make them as easy as possible to follow.
Materials needed:
- mouldings
- measuring tape
- pencil and paper
- Painters caulk
- Deltec purple masking tape
- spirit level
- mitre saw or saw + mitre box
- primer for pine wood
- No More Nails adhesive
- wall paint
Step 1: Planning
This step is the most time-consuming but also the most important to ensure a good result. Start by measuring the room using the measuring tape. Make sure to take into account the position of fixtures and fittings like plug sockets and light switches. Draw up a rough sketch of each wall with measurements written down. Include any doors and windows.
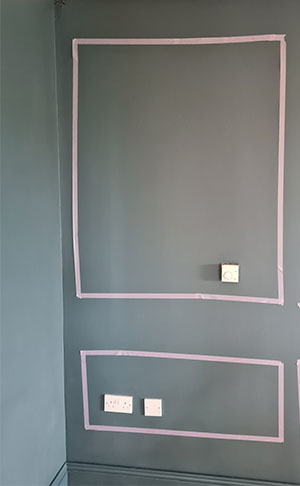
I wasn’t sure what size panels I wanted to go for initially so here is a really helpful tip to visualise shape and size on the walls. I used Deltec purple masking tape on the walls to replicate the size and position of the panels I wanted. I did this on one wall only but it really gave me a good starting point. Make sure to take the thickness of the masking tape into account if it is wider than the mouldings you are using.
TIP: Make sure the masking tape you use is a sensitive one i.e. it won’t pull off paint from the wall when you remove it. As I had freshly painted my walls I definitely didn’t want this to happen!
When I was happy with the positioning and size of the panels I marked the start points on the wall with a pencil. In order to achieve a pretty symmetrical look around the room, it is a good idea to try have panels with similar width and also similar spacing between panels. This was not possible all round the room due to the position of light switches and sockets but I tried to stick to using only a few different sizes of panelling overall. I placed the lower panels 20cm up from the skirting board and 10cm in from the wall. They were 1m wide and 40cm high. Spacing between the upper and lower panels was 30cm. Upper panels were 1m wide and 1.2m high. This gave a gap of 20cm from the top of the upper panel to the ceiling, similar to the spacing at the bottom of the wall. There are some variations around the room as mentioned to factor in position of sockets and switches. These are not noticeable though as human eyes are not sensitive enough to spot differences of a few centimetres.
STEP 2: Measure and cut
Measure out the lengths of mouldings needed using a measuring tape and pencil. Measure twice cut once is definitely worth noting! I used Cheshire mouldings Pine glass bead 2.4M x 15mm from Woodies. Link here.
I primed the raw pine first using Multistop primer from Tikkurila which stops any knots bleeding through from the raw wood.
Cut mouldings using a mitre saw or else a hand saw and mitre box. I used a mitre saw as that is what I had available. Cut edges at a 45 degree angle so the lengths will fit together nicely on the wall.
Step 3: Attach to the wall
Using No More Nails on the back of the moulding, attach panels to the wall and hold in place for 20 seconds before moving onto the next piece. Check the panel is level using the spirit level before you firmly attach it in place. As the mouldings I was using were not very thick or heavy I didn’t need to use any nails to attach them to the walls. Continue around the room attaching panels to the walls. Make sure to keep using the spirit level as you go.
Step 4: Caulk and fill
Leave the adhesive to set for 24 hours before caulking. You will need to caulk all the edges of the panels and all the joints where the lengths meet. This will ensure a seamless look to your panelling and give a more professional finish. Apply the caulk and wipe off the excess with a damp cloth as you go along. Be warned though the caulk tends to be a bit messy so you will need to work quickly!
Step 5: Paint
I left the caulk to dry for 24 hours before painting. I needed to use 3 coats of the wall paint to ensure all the white primer was covered. This is because I had chosen such a dark wall colour so the white was more noticeable. The paint I used was Tikkurila Optiva 5 in Petrol which is a durable matt emulsion.

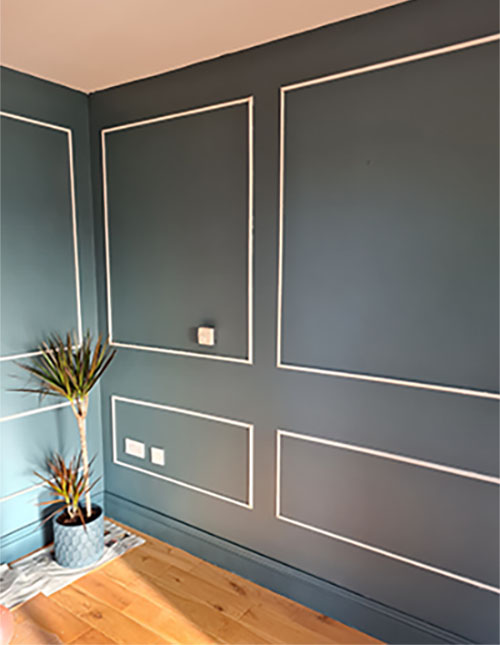
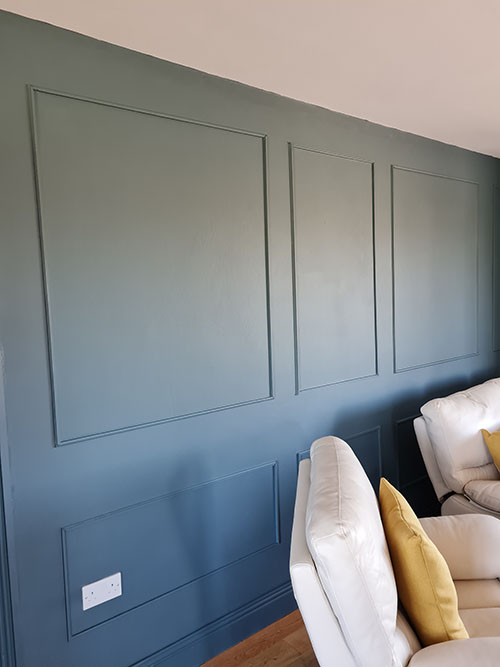
I’m thrilled with the final results. The panelling adds such character to the living-room. I have never tried doing panelling before so it was a learning curve all round. I hope you found this step by step guide easy to follow and that you are inspired to try it yourself!